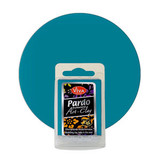
Description
This high quality oven hardening clay is particularly suitable for filigree work because it is dimensionally stable and firm enough to maintain fine hard edges when baked. Colors are formulated to easily mix with one another but at the same time, maintaining their original sharp color shade with no visual smearing or bleeding. This clay contains pure beeswax and premium quality pigments and is condensation resistant. Easy to condition colors. Pardo Art Clay comes in true vibrant colors that are extremely strong and maintains color after baking.
Ginger Davis Allman - The Blue Bottle Tree - did extensive comparison testing with the different brands of translucent clays. Click to read her findings here and here.
Please also take a look at the article written by Ginger at The Blue Bottle Tree:
"It’s easy to assume that your clay has been partially cured or is old. But hold on! There is a trick to it. Pardo is not like other brands of polymer clay. Here’s how to condition Pardo Art Clay."
Betty Jo Hendershott graciously let me present the following experiments she has carried out. Scroll to the bottom to read more about Betty Jo.
Experimenting with Translucent Pardo Art Clay
I picked up a couple packages of Pardo Translucent Art Clay. I also purchased bronze, gold and silver metallic Pardo Jewellery Clay. I thought I would give these a try before I invested in a wider variety of colors.... though I was tempted to buy one of everything.
I purchased red, blue and purple flower canes from my friend Jackie. Jackie makes beautiful canes... I love her flowers and her kaleidoscope canes are amazing. Do yourself a favor and check out her Etsy shop, The Pleasant Pheasant
-
I started with the translucent. It was easy to condition, I conditioned it the same as I do other brands, ran it through the pasta machine on the # 1 setting 20 times.
-
I divided it into 5 pieces and tinted with Ranger alcohol inks. I let it sit until the ink dried and then used the pasta machine to blend in the colors.
-
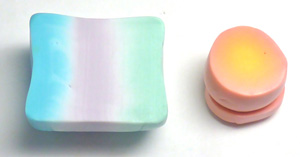
I made a muted skinner blend with the blue, lavender and green with clear between the colors and a second skinner blend with the amber and red.
-
I then covered a sheet of Kato Pearl with silver leaf, ran it through the pasta machine on the 2 and 3 settings to get a crackled effect.
-
I ran a sheet of the tricolor translucent to the #8 setting and placed it over the Kato Pearl.
-
Next I cut thin slices of my Jackie flower canes and placed them on top of the translucent.
-
I smoothed the cane slices by placing a piece of parchment paper over the surface and burnished with the back of a spoon.
-
I then cut a shape I liked and popped it in the oven for curing.
-
I dropped it into an ice bath right out of the oven...and I immediately saw the translucent begin to clear.
-
After sanding and buffing I used Pigma Micron pens to draw the curlicues. I found it difficult to draw on a slick surface with a permanent pen... it's obvious I need to practice, hopefully I will do better next time.
-
I added micro glass balls in tiny drops of Kato liquid clay and put it back in the oven for 15 minutes to set the liquid clay and the ink. The frame is black Kato clay painted with PearlEx silver.

-
For the next one I used the 2nd Skinner blend, again running it through the pasta machine to the #8 setting.
-
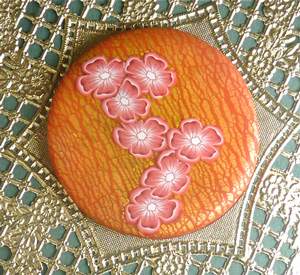
The background is crackled gold leaf over red and I used more of Jackie's red flower cane to decorate the top.
I'm not through with this one. I may add more to the top or bead around it. I love the way the flowers seem to be floating across the surface.
I was very pleased with the Pardo translucent. No problems at all.
-
It was easy to condition.
-
The inks mixed well.
-
It went through the pasta machine to the thinnest setting without any wrinkling or sticking to the rollers.
-
It sands and buffs to a high shine.
-
It is clearer than the other brands of translucent.
Now I am off to try the metallics.
~ ~ ~ ~ ~ ~ ~ ~ ~ ~ ~ ~ ~
More Pardo Clay Projects
I purchased one of every color plus two whites and two translucent and, as you can see, I purchased some of the paints too.

-
I made these canes.

The clay conditioned with ease and reduced wonderfully. So far I'm loving it. Very little distortion and the canes are easy to slice.
I used my extruder for this one, the one on the right is from left over clay. The clay is expensive so I don't want to waste a single bit.

This was an experiment.
-
I rolled a sheet of translucent out to the #9 setting on my pasta machine.
-
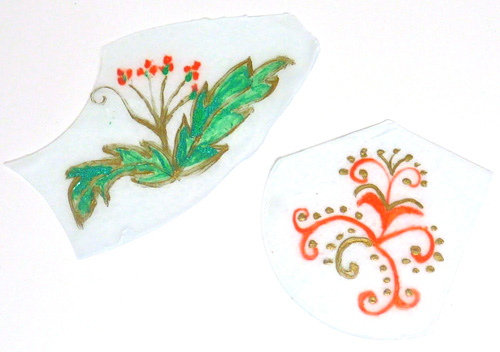
I laid it on a ceramic tile and painted some squiggles on the raw clay with the metal paints.
-
I cut the excess clay from around the images (again because of the cost I didn't want to waste clay) and popped it in the oven.
-
The cured pieces are very strong and flexible.
-
I tried bending it every which way and it didn't break.
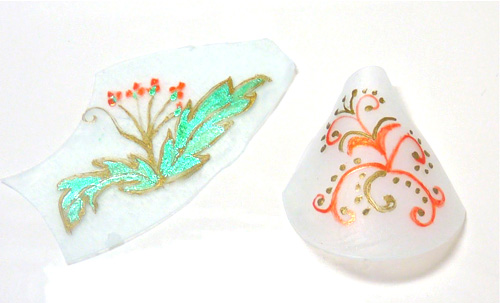
Next I am going to try it with the colored clay and see what happens. If the thin sheets are strong enough I would like to use them with wire. I have a plan in my head, now we will see if it works.
~ ~ ~ ~ ~ ~ ~ ~ ~ ~ ~ ~ ~
Pardo Clay Again
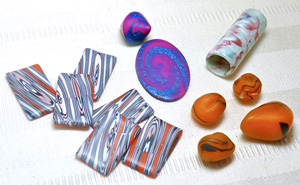
I did finish a few examples.
-
The bracelet tiles are made from cane scraps.
-
The swirlie tile and bead are from magenta Pardo
-
For the blue, I tinted Pardo translucent with blue metal paint and then added glitter. I had a hard time getting the Pardo clay to swirl, not sure if it is the clay or me, I was tired and may have given up to soon. I'll try again and let you know.
-
The tube bead is from scraps and thin sheets of Pardo translucent covered in glitter.... did I mention I like glitter?
-
The nuggets are Pardo translucent tinted with Ranger alcohol ink. The color is butterscotch and I added a few veins of chocolate with chocolate brown Fimo Classic. The large nugget has been sanded and buffed, the little ones are not sanded or buffed.
~ ~ ~ ~ ~ ~ ~ ~ ~ ~ ~ ~ ~
More Pardo Art Clay
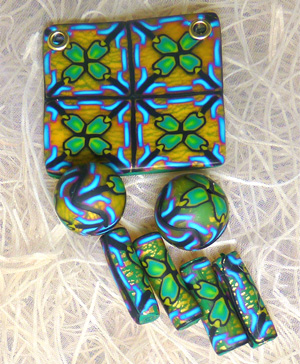
Here is another cane with Pardo Professional Art Clay.
-
This time I tinted some translucent with alcohol ink (the yellow portion of the cane) and used it for the background.
This is the cane before reduction.
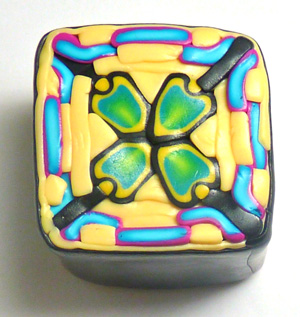
This is the cane after reduction. The other two are mini canes from scraps.
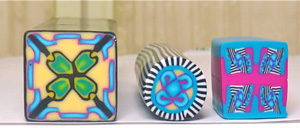
-
As you can see, very little distortion.
-
It is very easy to reduce.
-
I didn't have to let it rest before reducing like I do the other brands.
-
The canes slice neatly and the slices hold their shape.
-
I do quarter turns after each slice to keep them as square as possible.
-
The background is gold leaf over green clay.
-
My photographic skills are limited so I wasn't able to show the depth the translucent creates but I think you get the idea.
-
I sanded and buffed the pendant tile.
-
I tried to pop the eyelets out before sanding but they wouldn't come out so I sanded over them, they look pretty good sanded.
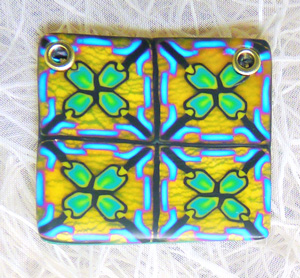
I haven't sanded and buffed the beads yet.
I used thinner slices of cane on the beads so the gold leaf shows up better.

~ ~ ~ ~ ~ ~ ~ ~ ~ ~ ~ ~ ~
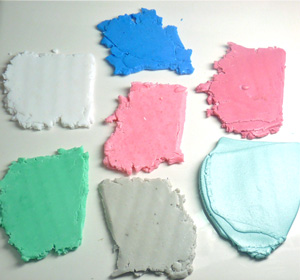
I also tried tinting Pardo translucent with Viva Precious Metal paint.
 |
 |
|
I conditioned the clay, divided a sheet of #1 thickness into 6 small pieces and then painted with the Viva paints. |
Here is how they look mixed in. As you can see I also added a piece that I'd made earlier with blue. Once the gold was mixed it it turned a yucky gray. |
|
The first is pearl, 2nd is coral, 3rd is crimson, the 4th is emerald, the 5th is gold and the last one is a mix of green and blue with a little gold that was left on the brush. I let them sit until the paint was dry, about an hour. By the way you can clean the brushes with soap and water. |
|
-
I rolled out the colors to the #9 setting on the pasta machine and placed them over clay with different designs.
-
As you can see in this photo the paint takes away most of the translucent effect.
-
The pearl didn't mix in very well.
-
I added glitter to the gold and the green.
-
Needless to say I didn't get the effect I was going for so I'll have to come up with a different use for the rest of the tinted clay.

When all else fails... make swirlies. I'll try that tomorrow.
 |
Betty Jo Hendershott - Southern Illinois, United StatesI became interested in jewelry making after I retired. I started with polymer about 3 years ago, added wire work a year ago and have recently become interested in bead work. I like learning something new everyday, I hope you enjoy viewing my work. If you have questions, suggestions, compliments, critiques, I'd love to hear from you. |
Brand
Viva Decor
Description
This high quality oven hardening clay is particularly suitable for filigree work because it is dimensionally stable and firm enough to maintain fine hard edges when baked. Colors are formulated to easily mix with one another but at the same time, maintaining their original sharp color shade with no visual smearing or bleeding. This clay contains pure beeswax and premium quality pigments and is condensation resistant. Easy to condition colors. Pardo Art Clay comes in true vibrant colors that are extremely strong and maintains color after baking.
Ginger Davis Allman - The Blue Bottle Tree - did extensive comparison testing with the different brands of translucent clays. Click to read her findings here and here.
Please also take a look at the article written by Ginger at The Blue Bottle Tree:
"It’s easy to assume that your clay has been partially cured or is old. But hold on! There is a trick to it. Pardo is not like other brands of polymer clay. Here’s how to condition Pardo Art Clay."
Betty Jo Hendershott graciously let me present the following experiments she has carried out. Scroll to the bottom to read more about Betty Jo.
Experimenting with Translucent Pardo Art Clay
I picked up a couple packages of Pardo Translucent Art Clay. I also purchased bronze, gold and silver metallic Pardo Jewellery Clay. I thought I would give these a try before I invested in a wider variety of colors.... though I was tempted to buy one of everything.
I purchased red, blue and purple flower canes from my friend Jackie. Jackie makes beautiful canes... I love her flowers and her kaleidoscope canes are amazing. Do yourself a favor and check out her Etsy shop, The Pleasant Pheasant
-
I started with the translucent. It was easy to condition, I conditioned it the same as I do other brands, ran it through the pasta machine on the # 1 setting 20 times.
-
I divided it into 5 pieces and tinted with Ranger alcohol inks. I let it sit until the ink dried and then used the pasta machine to blend in the colors.
-
I made a muted skinner blend with the blue, lavender and green with clear between the colors and a second skinner blend with the amber and red.

-
I then covered a sheet of Kato Pearl with silver leaf, ran it through the pasta machine on the 2 and 3 settings to get a crackled effect.
-
I ran a sheet of the tricolor translucent to the #8 setting and placed it over the Kato Pearl.
-
Next I cut thin slices of my Jackie flower canes and placed them on top of the translucent.
-
I smoothed the cane slices by placing a piece of parchment paper over the surface and burnished with the back of a spoon.
-
I then cut a shape I liked and popped it in the oven for curing.
-
I dropped it into an ice bath right out of the oven...and I immediately saw the translucent begin to clear.
-
After sanding and buffing I used Pigma Micron pens to draw the curlicues. I found it difficult to draw on a slick surface with a permanent pen... it's obvious I need to practice, hopefully I will do better next time.
-
I added micro glass balls in tiny drops of Kato liquid clay and put it back in the oven for 15 minutes to set the liquid clay and the ink. The frame is black Kato clay painted with PearlEx silver.

-
For the next one I used the 2nd Skinner blend, again running it through the pasta machine to the #8 setting.
-
The background is crackled gold leaf over red and I used more of Jackie's red flower cane to decorate the top.
I'm not through with this one. I may add more to the top or bead around it. I love the way the flowers seem to be floating across the surface.

I was very pleased with the Pardo translucent. No problems at all.
-
It was easy to condition.
-
The inks mixed well.
-
It went through the pasta machine to the thinnest setting without any wrinkling or sticking to the rollers.
-
It sands and buffs to a high shine.
-
It is clearer than the other brands of translucent.
Now I am off to try the metallics.
~ ~ ~ ~ ~ ~ ~ ~ ~ ~ ~ ~ ~
More Pardo Clay Projects
I purchased one of every color plus two whites and two translucent and, as you can see, I purchased some of the paints too.

-
I made these canes.

The clay conditioned with ease and reduced wonderfully. So far I'm loving it. Very little distortion and the canes are easy to slice.
I used my extruder for this one, the one on the right is from left over clay. The clay is expensive so I don't want to waste a single bit.

This was an experiment.
-
I rolled a sheet of translucent out to the #9 setting on my pasta machine.
-
I laid it on a ceramic tile and painted some squiggles on the raw clay with the metal paints.
-
I cut the excess clay from around the images (again because of the cost I didn't want to waste clay) and popped it in the oven.

-
The cured pieces are very strong and flexible.
-
I tried bending it every which way and it didn't break.

Next I am going to try it with the colored clay and see what happens. If the thin sheets are strong enough I would like to use them with wire. I have a plan in my head, now we will see if it works.
~ ~ ~ ~ ~ ~ ~ ~ ~ ~ ~ ~ ~
Pardo Clay Again
I did finish a few examples.

-
The bracelet tiles are made from cane scraps.
-
The swirlie tile and bead are from magenta Pardo
-
For the blue, I tinted Pardo translucent with blue metal paint and then added glitter. I had a hard time getting the Pardo clay to swirl, not sure if it is the clay or me, I was tired and may have given up to soon. I'll try again and let you know.
-
The tube bead is from scraps and thin sheets of Pardo translucent covered in glitter.... did I mention I like glitter?
-
The nuggets are Pardo translucent tinted with Ranger alcohol ink. The color is butterscotch and I added a few veins of chocolate with chocolate brown Fimo Classic. The large nugget has been sanded and buffed, the little ones are not sanded or buffed.
~ ~ ~ ~ ~ ~ ~ ~ ~ ~ ~ ~ ~
More Pardo Art Clay
Here is another cane with Pardo Professional Art Clay.
-
This time I tinted some translucent with alcohol ink (the yellow portion of the cane) and used it for the background.
This is the cane before reduction.

This is the cane after reduction. The other two are mini canes from scraps.

-
As you can see, very little distortion.
-
It is very easy to reduce.
-
I didn't have to let it rest before reducing like I do the other brands.
-
The canes slice neatly and the slices hold their shape.
-
I do quarter turns after each slice to keep them as square as possible.
-
The background is gold leaf over green clay.
-
My photographic skills are limited so I wasn't able to show the depth the translucent creates but I think you get the idea.

-
I sanded and buffed the pendant tile.
-
I tried to pop the eyelets out before sanding but they wouldn't come out so I sanded over them, they look pretty good sanded.

I haven't sanded and buffed the beads yet.
I used thinner slices of cane on the beads so the gold leaf shows up better.

~ ~ ~ ~ ~ ~ ~ ~ ~ ~ ~ ~ ~
I also tried tinting Pardo translucent with Viva Precious Metal paint.
 |
 |
|
I conditioned the clay, divided a sheet of #1 thickness into 6 small pieces and then painted with the Viva paints. |
Here is how they look mixed in. As you can see I also added a piece that I'd made earlier with blue. Once the gold was mixed it it turned a yucky gray. |
|
The first is pearl, 2nd is coral, 3rd is crimson, the 4th is emerald, the 5th is gold and the last one is a mix of green and blue with a little gold that was left on the brush. I let them sit until the paint was dry, about an hour. By the way you can clean the brushes with soap and water. |
|
-
I rolled out the colors to the #9 setting on the pasta machine and placed them over clay with different designs.
-
As you can see in this photo the paint takes away most of the translucent effect.
-
The pearl didn't mix in very well.
-
I added glitter to the gold and the green.
-
Needless to say I didn't get the effect I was going for so I'll have to come up with a different use for the rest of the tinted clay.

When all else fails... make swirlies. I'll try that tomorrow.
 |
Betty Jo Hendershott - Southern Illinois, United StatesI became interested in jewelry making after I retired. I started with polymer about 3 years ago, added wire work a year ago and have recently become interested in bead work. I like learning something new everyday, I hope you enjoy viewing my work. If you have questions, suggestions, compliments, critiques, I'd love to hear from you. |
Brand
Viva Decor
Product specs & benefits.
Free Cutter Offer
Love a surprise? Swing by every week to see what fun freebie drops on Friday! You never know what crafty treat might come your way!
Every order placed on Friday (CST) automatically includes the Friday Freebie—no code needed! Plus, share a photo of what you create and you could be entered into our quarterly drawing for more free stuff. Let the fun begin!
Shop now


