Makin's® Ultimate Clay Machine™ |
|
|
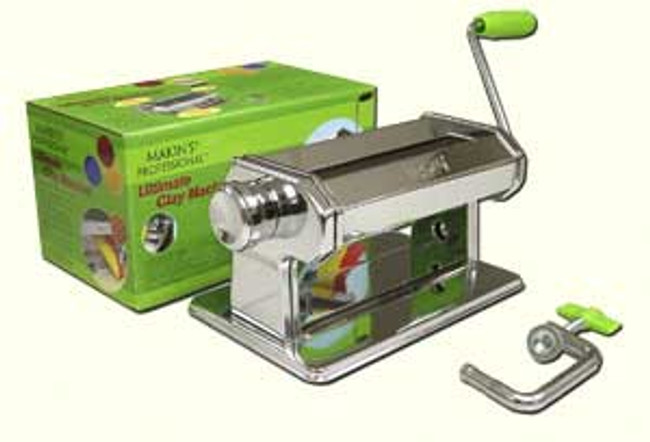
Makin's® Ultimate Clay Machine™ is WONDERFUL. The non-stick rollers don't leave ugly black marks on your clay. The working area is 7" instead of the usual 6". There are 9 thickness settings.
A Pasta Machine is highly recommended! (PM1) in our instructions means Setting #1 on the Pasta Machine. Some Pasta Machines have the thicknesses going from thinnest to thickest, the opposite of ours. Most only go to #7. Check your pasta machine and compare thicknesses and settings. CAUTION: Keep hands and fingers away from clay machine rollers when operating. |
|
|
Makin's® Ultimate Clay Machine™ MotorWhy not order the motor to go with your machine. The motor leaves your hands free to work with the clay.
CAUTION: Keep hands and fingers away from clay machine rollers when operating. This motor is made for use in the USA. It operates on 120 volts. Please be sure that this voltage is available in your country before ordering. |
![]() |
Benefits Sturdy chrome-plated steel construction. Can be used with all types of clay. Extra wide 7” (180mm) rollers. Non-stick roller surface. Nine thickness settings. Settings conform to clay industry standards (#1 setting produces thickest sheets of clay, #9 setting produces thinnest sheets of clay). Optional motor. General Uses:
Before using machine for the first time, roll some disposable wipes through the rollers repeatedly to remove any residue from manufacturing. To use machine for easy conditioning of clay, flatten clay by hand or with brayer or acrylic roller to a thickness slightly greater than Setting #1. Fold and roll clay until it is soft and pliable. Do not force excessively thick or stiff pieces of clay through the machine as this may cause damage to gears or rollers. To create thin sheets of clay, use progressively thinner settings. DO NOT attempt to roll clay at settings that are significantly thinner than thickness of clay. To change settings on machine, pull out numbered knob and turn to desired number. Release knob to lock in place. Always turn handle clockwise (away from you) to avoid damaging machine. Frequently wipe scraper blades to clean and remove clay build up using a moist towelette, disposable wipe, or soft cloth or paper towel saturated with rubbing alcohol. If excessive tearing, shredding, or rippling of clay occurs, dust clay with cornstarch, or sandwich clay between layers of wax paper, deli sheets, or baking parchment. Always use papers that are non-reactive with clay properties A homemade cornstarch dusting bag can be made using two pieces of cotton fabric cut into approximately 6 inch squares, positioned one on top of the other. Place about ½ cup of regular cornstarch in center of fabric square and bring all four corners of fabric up to meet. Fasten fabric just above cornstarch mound using string or elastic bands. When not in use, the dusting bag can be stored in small container or plastic sandwich bag. Shredding, tearing, and rippling of clay can also be minimized or avoided by allowing overly soft clay to “rest” for a few minutes before rolling through machine. This allows clay to “cool down” and stabilize and become firmer. Some clay brands may benefit from cooling with portable ice packs or brief refrigeration prior to rolling through machine. Check specific clay brand instructions for use of refrigerator for cooling clay. Remember, some clay brands are difficult to roll through clay machines at thin settings without tearing or shredding clay. Refer to books and online sources for more complete tips on producing thin clay sheets. Note: Clay sheets that are very thin are prone to a condition called “even rippling,” that is, indentation lines spaced at approximately ¼ inch intervals that are the same width as the clay, that coincide with the rotation of the machine’s gears. This rippling can be seen with any brand of clay using any brand of clay machine. While there is no remedy for even rippling, following the tips and techniques listed above can minimize ripples. If ripples are visible in clay sheets and will affect the outcome of your project, a brayer or acrylic roller can be used to smooth rippling before applying sheet to project. To Avoid Damaging Non-Stick Rollers Always roll clay through machine using progressive settings to avoid forcing rollers apart. When making repeated passes through machine with clay, alternate placing clay on left and right sides of machine to prevent misalignment of rollers and rippling of clay. Rolling clay with hard inclusions such as sand, beads, or mica flakes may scratch non-stick coating. However, clays containing manufacturer included mica powders, such as commercial polymer clays in metallic colors -- gold, silver, copper -- are safe for use with machine. Avoid placing clay sheets in freezer to cool before rolling through machine, as freezing can quickly occur and can damage non-stick rollers. Never use metal objects to dislodge clay from beneath rollers. Cleaning Your Machine A moist towelette, disposable wipe, or soft cloth or paper towel saturated with rubbing alcohol is suitable for cleaning rollers and bottom scraper blades. DO NOT use abrasive cleaners on roller surface. Disassembling machine for cleaning or any other purpose is not recommended. However, if you choose to disassemble your clay machine, be sure to obtain instructions for reassembling it prior to disassembly. Cautions Always clamp machine to table to prevent tipping unless you are using a motor. If you are using a motor never clamp the machine to the table. The rocking of the motor can pull the side off. Not for use with food. Do not allow children to use machine unsupervised as opening between rollers may be wide enough for very young children to pinch their fingers. WARNING: Some professional clay crafters prefer to remove various pieces of their clay machine, especially the two metal pieces also called plates, fenders or guards from the top of the machine. However, at this time we believe the plates are necessary components and should remain intact. Please be advised that if you remove parts for the clay machine we cannot be responsible for the results. Be sure you know how to re-assemble the machine prior to removing parts or taking the machine apart for any reason. Please note: Thickness settings mentioned in various clay tutorials may not always correspond to the thickness settings on the machine. For more tips and techniques, and other great products from Makin’s Clay ®, visit our website at: www.makinsclay.com . ©2006 Sino Harvest Ltd. All rights reserved. |
Save
Description
Makin's® Ultimate Clay Machine™ |
|
|
Makin's® Ultimate Clay Machine™ is WONDERFUL. The non-stick rollers don't leave ugly black marks on your clay. The working area is 7" instead of the usual 6". There are 9 thickness settings.
A Pasta Machine is highly recommended! (PM1) in our instructions means Setting #1 on the Pasta Machine. Some Pasta Machines have the thicknesses going from thinnest to thickest, the opposite of ours. Most only go to #7. Check your pasta machine and compare thicknesses and settings. CAUTION: Keep hands and fingers away from clay machine rollers when operating. |
|
|
Makin's® Ultimate Clay Machine™ MotorWhy not order the motor to go with your machine. The motor leaves your hands free to work with the clay.
CAUTION: Keep hands and fingers away from clay machine rollers when operating. This motor is made for use in the USA. It operates on 120 volts. Please be sure that this voltage is available in your country before ordering. |
![]() |
Benefits Sturdy chrome-plated steel construction. Can be used with all types of clay. Extra wide 7” (180mm) rollers. Non-stick roller surface. Nine thickness settings. Settings conform to clay industry standards (#1 setting produces thickest sheets of clay, #9 setting produces thinnest sheets of clay). Optional motor. General Uses:
Before using machine for the first time, roll some disposable wipes through the rollers repeatedly to remove any residue from manufacturing. To use machine for easy conditioning of clay, flatten clay by hand or with brayer or acrylic roller to a thickness slightly greater than Setting #1. Fold and roll clay until it is soft and pliable. Do not force excessively thick or stiff pieces of clay through the machine as this may cause damage to gears or rollers. To create thin sheets of clay, use progressively thinner settings. DO NOT attempt to roll clay at settings that are significantly thinner than thickness of clay. To change settings on machine, pull out numbered knob and turn to desired number. Release knob to lock in place. Always turn handle clockwise (away from you) to avoid damaging machine. Frequently wipe scraper blades to clean and remove clay build up using a moist towelette, disposable wipe, or soft cloth or paper towel saturated with rubbing alcohol. If excessive tearing, shredding, or rippling of clay occurs, dust clay with cornstarch, or sandwich clay between layers of wax paper, deli sheets, or baking parchment. Always use papers that are non-reactive with clay properties A homemade cornstarch dusting bag can be made using two pieces of cotton fabric cut into approximately 6 inch squares, positioned one on top of the other. Place about ½ cup of regular cornstarch in center of fabric square and bring all four corners of fabric up to meet. Fasten fabric just above cornstarch mound using string or elastic bands. When not in use, the dusting bag can be stored in small container or plastic sandwich bag. Shredding, tearing, and rippling of clay can also be minimized or avoided by allowing overly soft clay to “rest” for a few minutes before rolling through machine. This allows clay to “cool down” and stabilize and become firmer. Some clay brands may benefit from cooling with portable ice packs or brief refrigeration prior to rolling through machine. Check specific clay brand instructions for use of refrigerator for cooling clay. Remember, some clay brands are difficult to roll through clay machines at thin settings without tearing or shredding clay. Refer to books and online sources for more complete tips on producing thin clay sheets. Note: Clay sheets that are very thin are prone to a condition called “even rippling,” that is, indentation lines spaced at approximately ¼ inch intervals that are the same width as the clay, that coincide with the rotation of the machine’s gears. This rippling can be seen with any brand of clay using any brand of clay machine. While there is no remedy for even rippling, following the tips and techniques listed above can minimize ripples. If ripples are visible in clay sheets and will affect the outcome of your project, a brayer or acrylic roller can be used to smooth rippling before applying sheet to project. To Avoid Damaging Non-Stick Rollers Always roll clay through machine using progressive settings to avoid forcing rollers apart. When making repeated passes through machine with clay, alternate placing clay on left and right sides of machine to prevent misalignment of rollers and rippling of clay. Rolling clay with hard inclusions such as sand, beads, or mica flakes may scratch non-stick coating. However, clays containing manufacturer included mica powders, such as commercial polymer clays in metallic colors -- gold, silver, copper -- are safe for use with machine. Avoid placing clay sheets in freezer to cool before rolling through machine, as freezing can quickly occur and can damage non-stick rollers. Never use metal objects to dislodge clay from beneath rollers. Cleaning Your Machine A moist towelette, disposable wipe, or soft cloth or paper towel saturated with rubbing alcohol is suitable for cleaning rollers and bottom scraper blades. DO NOT use abrasive cleaners on roller surface. Disassembling machine for cleaning or any other purpose is not recommended. However, if you choose to disassemble your clay machine, be sure to obtain instructions for reassembling it prior to disassembly. Cautions Always clamp machine to table to prevent tipping unless you are using a motor. If you are using a motor never clamp the machine to the table. The rocking of the motor can pull the side off. Not for use with food. Do not allow children to use machine unsupervised as opening between rollers may be wide enough for very young children to pinch their fingers. WARNING: Some professional clay crafters prefer to remove various pieces of their clay machine, especially the two metal pieces also called plates, fenders or guards from the top of the machine. However, at this time we believe the plates are necessary components and should remain intact. Please be advised that if you remove parts for the clay machine we cannot be responsible for the results. Be sure you know how to re-assemble the machine prior to removing parts or taking the machine apart for any reason. Please note: Thickness settings mentioned in various clay tutorials may not always correspond to the thickness settings on the machine. For more tips and techniques, and other great products from Makin’s Clay ®, visit our website at: www.makinsclay.com . ©2006 Sino Harvest Ltd. All rights reserved. |
Save